
Secure your smartphone or laptop from theft
Tech
April 22, 2016 10:00
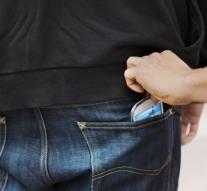
- It will never happen to me, we all think of theft of your laptop, smartphone or tablet. Until it does happen, and then you holding the bag. Therefore it is good to be prepared, something you can not do with ease with a few handy tools.
The most important thing is to prevent your laptop being stolen. For this you have several options. You can buy a laptop lock, but they are often expensive and limit your mobility. Another solution may be to deal with the software. Antitheft software often works through (if the laptop is locked) to monitor whether something is disengaged, such as a USB stick, peripherals or adapter. If that is the case, then an alarm is triggered.
A useful program for example A. L. A. R. M. Execute the downloaded file. By default the program starts with Windows on it. Click Next / Install, and then click Close. Open the program from the Start menu, then click the tray icon on the taskbar. A. L. A. R. M. standard already built a sound, you can test it by clicking the play button. Ensure that only enabled while workstation is locked is enabled and do not run away when you turn on speakers and lock your laptop.
Tip 01 A. L.A. R. M is a very simple tool that gives you more security if you briefly just leave your laptop.
Should it still come so far that your laptop is stolen, you will of course that thieves can not with your personal information. To avoid this, the best option is to encrypt your laptop. Almost all Macs have default support for FileVault, full hard disk encryption. On Windows you have two possibilities: BitLocker or Vera Crypt. BitLocker is Microsoft's own solution to encrypt your laptop, but that is only available for the Professional editions of Windows (Windows 7).
Vera Crypt is the spiritual successor to the discontinued TrueCrypt, that project stopped Vera Crypt in 2013. mysterious reasons, the ability to encrypt also your hard drive completely. We are going to tip 5 to work with Vera Crypt and show you how to put encrypted files here. Although Vera Crypt has the option to encrypt the entire Windows disk, this will not work on computers with UEFI. Vera Crypt can only handle Windows starts in 'legacy' mode, which will not be the case with almost all laptops with UEFI. That's why we're also explain first how BitLocker works.
Tip 02 Almost all Macs support FileVault, full hard disk encryption. Unfortunately, that is not the case on the Windows side.
If you still want to like using BitLocker and you have Windows 10 Home, you can easily upgrade. Go to the Settings app / Update and Security, and then choose to go for Activation / In Store. There you can buy the upgrade for Windows 10 Pro, which costs 99.99 euros. Previously not guarantee that your computer can handle BitLocker. That depends on a number of factors. A computer with a TPM chip will often work. If your computer has such a chip can be found in the laptop specifications. Furthermore, there are required at least two partitions: a partition with Windows itself that is encrypted, and a partition to boot from on. BitLocker will attempt to create it automatically. The BIOS must comply with the standards defined by the Trusted Computing Group (TCG) and during startup can read from a USB stick.
Tip 03 via the Windows Store, you can easily upgrade to Windows 10 Pro.
Once upgraded to Windows 10 Pro, enable BitLocker by going to the Control Panel and select System and Security and then BitLocker Drive Encryption. Click Turn on BitLocker to start the wizard to set it up. It may be that you get an error about a missing TPM chip. Open the Start menu and type in Group Policy and press Enter. Go to Computer Configuration / Administrative Templates / Windows Components / BitLocker Drive Encryption / System stations.
Choose Extra require authentication at startup by double clicking on it, select Enabled and make sure the option Allow BitLocker without a compatible TPM is checked. Click OK to apply the changes and restart the BitLocker Wizard. Follow the steps in our case we did just click Next and then just restart. The wizard will then resume where you can choose the encryption, namely by means of a USB stick or a password. If you choose a USB stick, you must enter it when you start Windows to continue.
Tip 04 If your laptop does not have a TPM chip, go to Group Policy and enable the Allow BitLocker without a compatible TPM.
Vera Crypt you can create an encrypted 'container', a kind of partition in which you can in Windows Explorer. In this container, you can then place files, all of which are automatically encrypted. You download Vera Crypt via this website. Click the Recommended version to download and get it. exe file inside. Run the downloaded file, agree to the license terms and click Next / Next / Install. Finally, click OK and then click No. Open Vera Crypt by clicking on the desktop shortcut.
Tip 05 The default options when Vera Crypt system you do not have to adjust.
Now Vera Crypt is installed, you can create the encrypted volume. Click on the Create Volume button. The top option, Create an encrypted file container is good and so you now click Next. A Standard Vera Crypt volume is fine, so click Next again. Now click on Select File and choose the location where the container is to be beaten up. You can place containers on eg USB sticks, in a cloud service or simply on your own hard disk, but in the case of theft or you lose the container. The file name is not important and the extension either.
Click Next and then you have to choose the encryption algorithm. By default, AES, SHA-512 hashing algorithm is selected. That's very good security, so click Next again. Next, it is necessary to set the size of the volume. We choose now to 1GB. After filling Next. It is now necessary to enter a password that is used for encryption. It is very important that you choose a strong password. Otherwise, consider a passphrase (also called passphrase), by the length that standard safer and easier to remember. Move the mouse in the window at random, in order to strengthen the encryption. On the basis of the mouse moves a random key is built up. The more strokes, the more random the key. Do this for at least 30 seconds. Then click Format to create the partition. Finally, click OK and then click Exit.
Tip 06 Choose the option Create an encrypted file container to create an encrypted virtual partition.
In order to see the volume you just created, click on the main Vera Crypt top of a drive letter. In this case, we simply choose M :. Then click Select File and browse to the stored volume that you made earlier. Then click Mount, enter your password, and then click OK. You can now open Windows Explorer and sees a disk with the letter M: added, with the size you have selected. Now you can quietly read and write files to the disk. Everything is encrypted it. Vera Crypt you can just close the container will remain available. To disconnect the partition again, if you are ready for example, open your Vera Crypt, select the appropriate drive letter and click on the button Dismount.
Tip 07 To disconnect the volume again, select the drive letter and click Dismount.
Apart from your laptop it is even easier to lose your smartphone and tablet. Not very nice when it falls into the wrong hands. On iOS imagine encryption by setting a PIN. If you already have a PIN, you can check that everything is encrypted by opening the Settings app and go to Touch ID and password or access code when you do not have a Touch ID. Enter your PIN number and go to the bottom at all. If there is data security is on, you know that your device is encrypted. Use your still feel the four-digit PIN? Now you're here, you can change it right here to a six-digit code that is safer. To do this, tap Change Password. Then enter the current code and then tap Password Options / 6-digit code. Then enter twice about code and you're back a lot safer.
For Android, it is also necessary to set a PIN, but then it is necessary to manually encrypt the internal storage. PIN imagine by going to the Settings app and personally choosing Security. Then tap Screen lock and select your PIN or PIN (exact naming is subject to the Android version and brand phone). Enter twice your desired PIN, choose how you want to display messages and tap Done. Then you can opt for Phone / Tablet to encrypt Encryption. Make sure the battery is sufficiently charged and that the charger is connected and encrypt tap Phone / Tablet.
Your device will reboot a couple of times, after which the encryption starts. please note that encryption on Android can provide a significant performance reduction. Newer chips in smartphones and tablets have hardware support for encryption and that are faster, but old SOCs can it more difficult to cope with.
If your laptop is still stolen, you want to follow this course and the perpetrators are trying to address. This is possible with software like Prey. The free version of this allows you to somewhat determine a location, receive messages and to lock the screen. Paid versions have the option to erase the laptop remotely and retrieve files that you absolutely need. You download Prey from preyproject. com, where you must first create a user account.
Click on Get Started, and fill in the requested information and click Sign Up. You will be notified immediately. To protect the current computer, left-click on Download Prey. Otherwise log into the PC on which you want to protect and click there on the download button. Choose the appropriate operating system and run the downloaded file. Click Next, then I Agree followed by Install. If necessary an extra. NET version installed (an auxiliary user program), click Yes and follow. NET installation steps. Click afterwards on Finish in Prey and choose Existing User / Next. Enter your username and password and click Next and then click OK. Now you're ready! Your laptop is protected now and you can follow through preyproject. com.
Tip 10 right, you can play an alarm on the laptop, send a message or lock the device.
Besides tracing the location is also very convenient to identify the thief. To do that you can use a webcam, something every laptop does have. Combined with Yawcam it is possible to automatically create webcam shots as movements are detected behind the laptop and you them over to make an e-mail informed. Make sure that Java is installed, you can download it from Java. com.
You download Yawcam here. Click yawcam_install. exe and run the downloaded file. Click Yes to continue, accept the license and choose some times for Next / Install and click Finish afterwards. Yawcam opens now. If you want Yawcam in Dutch, choose Settings / Edit Settings and then left click on Language and Change. Choose yawcam_lang_dutch_0. X. X. xml and click Open and OK.
Tip 11 Choose the selected file from the list to set the language in Dutch.
To ensure that Prey and Yawcam do its job, it does require that the laptop is connected to the Internet. There is little chance of that happening if the thief can not log in. This is him then install natural again. Therefore, to make it useful additional user. That way you have time to track down your laptop and the thief with Yawcam and Prey. You create an additional user account in Windows 10 by going to the Settings app and select Accounts. Click on Family and other users / Someone else to add to this PC. I do not go then to add the credentials of the person and select user without a Microsoft account. Fill a user, for example Laptop Guest, leave the password blank and click Next to add the user.
Tip 12 Creating an additional user requires a lot of clicking.
Now select your webcam to Settings / Device / Change Device to, select the webcam and click Save. We'd like to move a snapshot, so click on to Motion. Click on Window / Motion detection and go to the Actions tab. Check that the option Send e-mail and click on Settings. To fill in the e-mail address where the image to go. By Subject and Message you can possibly send a personalized message.
Tick Attach Image to send them the picture of the thief. In SMTP server, it is necessary to fill in the details of your email server. For example you can use Gmail for this. For Gmail thereby smtp. gmail. com, Port fill 465 and uncheck the options Use encrypted connection. (SSL) and Password required to. Enter below your username and password of the Google Account you want to use for this. Provide assurance that your Gmail also provides access to less secure apps by choosing here for Enable.
To automatically start Yawcam if this user logs on, it is necessary to install the Yawcam service. To do this in the Start menu to the Yawcam folder, click Open, right-click Install Service and choose More / file location. Right-click on Install Service, and choose Run as administrator. Yawcam is always active now.
To prevent Yawcam active as you can log in, go to the Task Scheduler by searching the start menu. Left click Task Scheduler Library and select the right for a new task. Give the task a name and go to the Triggers tab. Click New, and select from the list to start this task for the option Register with. Select specific user and click OK. Go to Actions and click New. Click Browse and browse to C: \\ Program Files (x86) \\ Yawcam and choose Yawcam-NTservice-STOP. bat. Click Open / OK. Go to the Conditions tab and remove the two ticks away at Energy. Click OK to save the task.
Tip 14 The task runs when you register so Yawcam is put at that time stop. If the thief turn on the laptop and then log in, may be the Yawcam service active.
If your smartphone or tablet is stolen, you can find these easily with Android and iOS thanks to the built-in capabilities. iOS has this Find My iPhone, Android has Android Device Manager. Is your iPhone or iPad stolen, go as quickly as possible to the website www. iCloud. com and sign in. Click Search iPhone, unlike the name suggests it also finds iPads (and even Macs / MacBooks). top Under All devices your stolen device from the list and choose Lost mode. This mode ensures that the device is locked, there is a message on the screen that you can set yourself and the location is transmitted, even if it is off. On any iOS device will search iPhone by default. You can check this by opening the Settings app and go to iCloud. Scroll down to the bottom where you see Find My iPhone. There you can turn on the direct mode.
Android link you to access this feature through the Settings app and go to Security. Tick the two options under Android Device Manager. To track your Android device, go here. There you can also click Lock. Possibly the Android Device Manager app is handy, so you can follow another smartphone or tablet a lost device quickly.
Tip 15 Android Device Manager has similar capabilities as Search Apple iPhone and runs on Android 2. 2 and newer.
Leave a comment